Procreate is an excellent tool for all artists to know about and help them with their art. Using the Eraser tool also makes it very easy to erase things.
Procreate has a very advanced and easy eraser tool that you can use to erase when using the Procreate app. Even though the tool is relatively straightforward, some tips and tricks can help you use the Procreate eraser tool more efficiently and effectively.
Table of Contents
- Using the Eraser Tool
- Tips and Tricks To Using The Procreate Eraser Tool
- Frequently Asked Questions
- Related Questions
Using the Eraser Tool
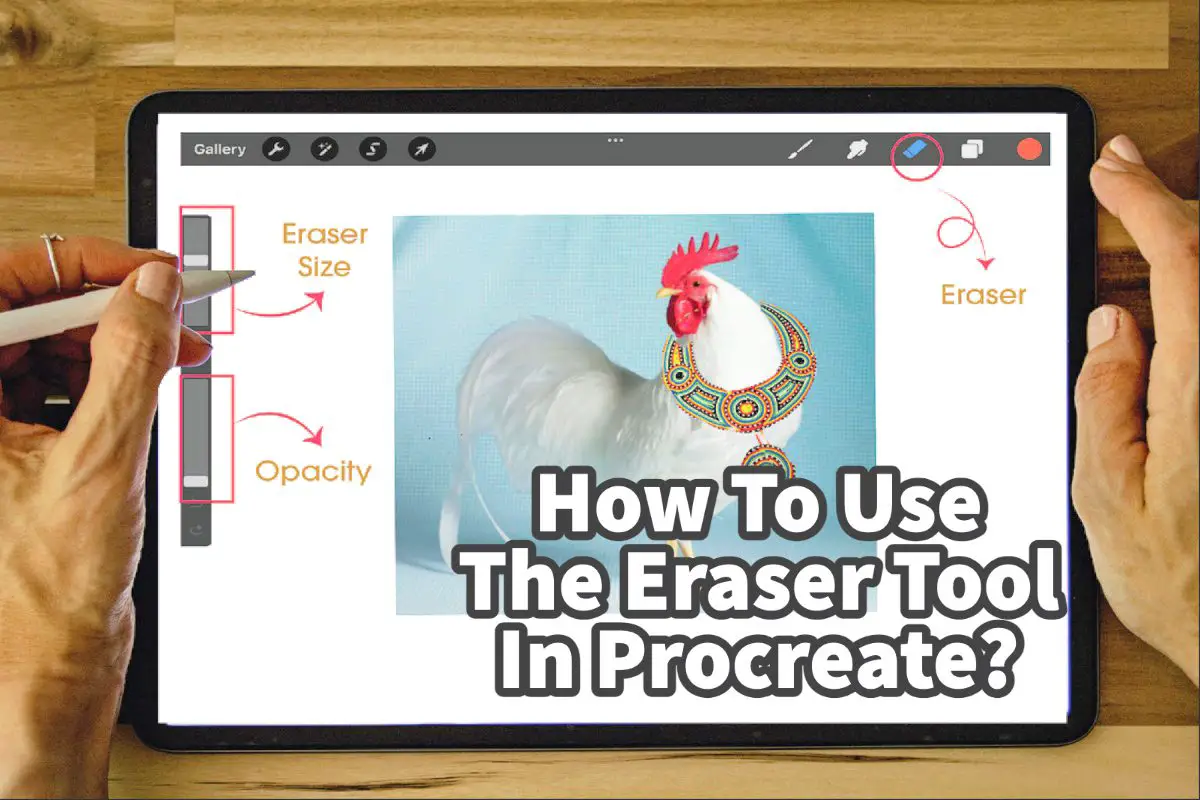
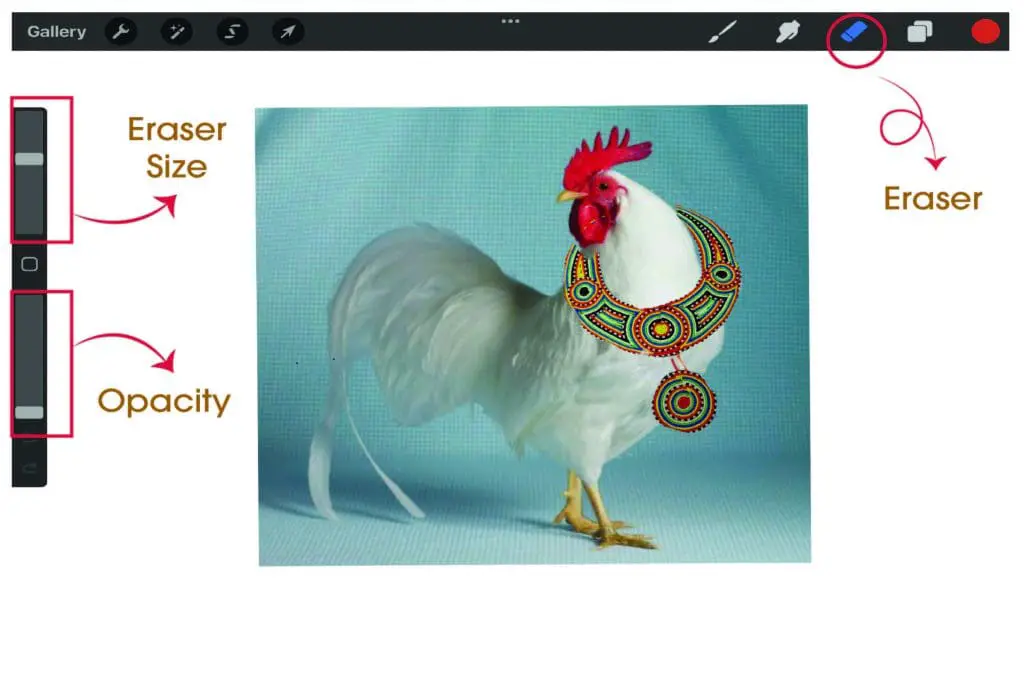
The eraser tool in Procreate is located at the top left-hand side of the app. The eraser tool is the eraser icon between the brush size opacity tool and the layering.
When you click on the eraser tool, it will turn to a blue color, and then you will know that the eraser function is now turned on. The eraser function is not yet turned on if it is not blue. You can use either your finger or an iPad pencil to touch the eraser to turn it on.
Tips and Tricks To Using The Procreate Eraser Tool
The eraser tool in Procreate is an invaluable asset we frequently use. It’s an excellent tool that every Procreate user should become familiar with and understand how to utilize.
Here are some tips and tricks to be able to help you to use the eraser tool better.
Brush Sizes Vs. Eraser Sizes
Whatever size your brushes you use will usually be the same size as the eraser. Sometimes, it can confuse some people; you need to be careful what your eraser is when working with the eraser tool.
You can quickly check this by moving the brush size to the size you want your eraser to be. The sizes will go from 1% to 100%. The 100% usually means that you want or need to erase a large area.
Opacity and Eraser Tool
You must also check your opacity settings when you use the eraser tool. The opacity works like the brush tool, going from 1% to 100%. If you have your opacity on 1%, the eraser does not use the eraser.
Usually, when I am erasing, I want to have the eraser bring the opacity up to 100%. I find this more accessible so I do not have to review what I am erasing so many times.
Change Background Color
I will change the background color to a bright background to see what I am erasing much time. This helps me know what I am erasing and lets me get a clean erase.
If you change to a brighter color background, you can always change it again once you have finished erasing. One of the great things about Procreate is they make tasks as changing the background color very easy.
Double Tap To Undo Mistakes
One of the things I love about Procreate is that you do not need to worry if you make a mistake. You can double-tap with two fingers on your iPad screen, and it will undo what you have done.
This is similar to a Command Z on a Mac computer, allowing you to undo what you have done and return to your original copy.
I love this as it gives me confidence that I will not ruin my work and can return to where I was before if I make a mistake.
Erase Larger Areas First
I find it is best to turn my eraser tool up on high, and I start to eraser the larger sections I want to erase first. This way, it allows me to have a clean erase.
Also, the larger erase will help you to be sure to erase all you need to in the area you are erasing. This can be important if you are working on a background where it is hard to see what you are erasing.
Erase Medium Areas
After I have erased the larger areas, I will erase the areas using a medium-sized eraser. Depending on what I am erasing, I will bring my eraser setting between 30 to 60%. This allows me to get close to the edge but not right at the edge of what I am erasing.
Erase Close to the Edges
After erasing closer to the edge, I will bring my eraser down to about 10% to 30% and start eroding near the edge. If I want a very clean edge, I will not erase right at the border but get as close to the edge as possible.
Enlarge Work To Get Very Close
If you need a more precise edge, I will make my Procreate canvas very large until I see the pixels or boxes. Then I will erase pixel by pixel. This lets me get close to what I need to erase and make clean lines.
The Procreate eraser tool is a great tool to use. The more you can understand it, the better you will get with using this tool, allowing you to erase any background or anything you need to use the Procreate App.
We love the Procreate App and feel it is an excellent app for any artist to know and use. Check out some of our other great content about using Procreate to be a better artist.
Anita Louise Art is dedicated to art education, great artists, and inspiring others to find and create their art. We love art that uplifts and inspires. #ArtToMakeYouSmile! #ArtToMakeYouHappy!
If you want to see any of my art, you can find out more by clicking here. If you are interested in what inspires me and my paintings, you can discover more by clicking here.
We have a free newsletter and would love you to be part of our community; you can subscribe to the newsletter by clicking here. If you have any questions, I would be happy to talk to you. You can reach me, Anita, by clicking here.
Subscribe to our Anita Louise Art YouTube Channel, filled with great videos and information by clicking here.
Join us for our podcast “5 Minutes With Art.” Spend just 5 minutes a week with us to discover and learn about great art and artists. You can find out more about our podcast by clicking here.
Frequently Asked Questions
How do I access the Eraser Tool in Procreate?
To access the Eraser Tool in Procreate, simply select the brush icon in the toolbar, then choose the eraser icon from the brush library. Alternatively, you can swipe left with two fingers to activate the eraser temporarily.
Can I customize the size of the Eraser Tool in Procreate?
Yes, you can customize the size of the Eraser Tool by adjusting the brush size slider at the top of the screen. You can also use the QuickMenu to assign a specific size to the eraser for quick access.
Is it possible to change the opacity of the Eraser Tool in Procreate?
Absolutely! You can adjust the opacity of the Eraser Tool by using the opacity slider located next to the brush size slider. This allows for more control over how much you erase at once.
What is the difference between the regular eraser and the soft eraser in Procreate?
The regular eraser has a hard edge, providing a clean and sharp erase, while the soft eraser has a softer edge, useful for blending and creating smoother transitions between elements.
Can I undo eraser actions in Procreate?
Yes, Procreate supports the undo function. If you accidentally erase something, simply tap the undo arrow at the top-left corner of the screen or use the two-finger tap gesture to undo your last action.
How do I erase specific parts of my drawing without affecting the entire layer?
To erase specific parts, use the Selection Tool to isolate the area you want to erase. Then, apply the Eraser Tool within the selected region without affecting the rest of the layer.
Is there a shortcut for toggling between the brush and eraser in Procreate?
Yes, you can quickly toggle between the brush and eraser by tapping the icon in the toolbar or by using the two-finger swipe gesture. This makes it convenient to switch between drawing and erasing.
Can I use the eraser on a locked layer in Procreate?
No, you cannot directly erase content on a locked layer. Unlock the layer first by tapping on the layer and selecting “Unlock.” After that, you can use the Eraser Tool on the unlocked layer.
Is there an option to change the shape of the eraser in Procreate?
Yes, you can change the shape of the eraser by selecting a different brush from the brush library. Procreate offers a variety of brushes, each with its own unique shape, which can be used as an eraser.
Related Questions
Erasing and Changing a Color On A Background in Procreate
With Procreate, it is straightforward to erase the background with their erase tool; this tool works similar to how you would erase on paper using a pencil and eraser. Once the background is erased, you can use the color palettes to change the background color quickly.
You can discover more by reading Erasing and Changing a Color On A Background in Procreate by clicking here.
Is Procreate Easier Than Photoshop? What One Should An Artist Learn?
Procreate is a much easier computer program to learn than Photoshop, especially if you are new to the Adobe program. The Procreate program is a fabulous computer program to lay out your artwork before painting on the canvas. Photoshop can also design your artwork, but as it is a more robust program than Procreate, it will take much longer to master.
You can discover more by reading Is Procreate Easier Than Photoshop? What One Should An Artist Learn? by clicking here.