Procreate is an award-winning iPad app that has been designed specifically for the Apple iPad. Like many Apple programs, this program is very user-friendly and has many nice features. There are many ways that you can use procreate to become a better oil painter.
Procreate can help you set up palettes with color combinations and lay out your painting before you paint it. I find it an essential tool to help me with my oil painting. Procreate can do many things that can be done in Abode Photoshop. But Adobe Photoshop can take a lot of time to really master, and it is also quite expensive. The advantage of Procreate is that it is very user-friendly and ONLY USD 9.99 without any monthly or annual fees.
Table of Contents
- Enhancing Your Oil Painting Skills with Procreate: A Guide
- Frequently Asked Questions
- Related Questions
Enhancing Your Oil Painting Skills with Procreate: A Guide
Procreate, a renowned and user-friendly app created exclusively for the iPad, stands out as an essential tool for artists in the digital age. Its intuitive design and robust feature set make it an ideal companion for creatives, especially those specializing in oil painting.
This application transcends the traditional boundaries of artistic creation, offering a digital space where artists can experiment, plan, and refine their techniques with unprecedented ease and flexibility.
The versatility of Procreate lies in its ability to simulate a real-world art studio experience. For oil painters, the app becomes an invaluable asset, enabling the creation of custom palettes and the pre-visualization of artwork before the paint ever touches the canvas.
This digital platform mirrors many functionalities in professional software like Adobe Photoshop, yet it remains distinctively accessible and tailored for the iPad. By incorporating Procreate into your artistic process, you can explore new horizons in color theory, composition, and design — key components that are essential for mastering the art of oil painting.
Procreate’s impact on an artist’s growth is multifaceted. Not only does it offer a sandbox for experimenting with various styles and techniques, but it also serves as a powerful tool for fine-tuning the details that elevate a painting from good to great.
Whether you’re sketching out initial concepts or testing color schemes, Procreate streamlines the creative process, allowing you to focus more on your artistic vision and less on the logistical challenges.
In the following sections, we’ll dive deeper into how Procreate can enrich your journey as an oil painter, enhancing your skills and expanding your creative possibilities. Here are some of the great ways you can use Procreate to help you with your oil painting:
Set Up Color Palettes.
Procreate has a fantastic feature called palettes. This feature will allow you to set up your own color palette or use one of the preset color palettes they already have.
Setting up a color palette is relatively easy. The main thing you need to do is find the color and press that color on your iPad until it shows up in the top right-hand corner; once that color shows up in the top right-hand corner, you can add it to one of your palettes.
Ways Procreate Can Help You With Your Color Palettes
There are many ways that Procreate can help you improve your art. Here are some ways Procreate can also help and show you and help you as an artist:
- The color on the color wheel – Procreate will tell you where the color is on the color wheel. This should help you to be able to mix the color better, as you can see where it is located on the color wheel. Procreate will give you several ways to look at the color. You can view it on a palette with other colors or see it in the classic or disc view. The traditional view shows part of the color wheel but gives you more details for those colors. For example, if I have a white color and from the classic view, I can see that it showed some green tints to the white color. The color disc shows you where it is on the color wheel.
- Color Values – Procreate will give you the value of the colors, such as the HSB, RGB, and Hexadecimal values.
Different Brushes or Brush Strokes
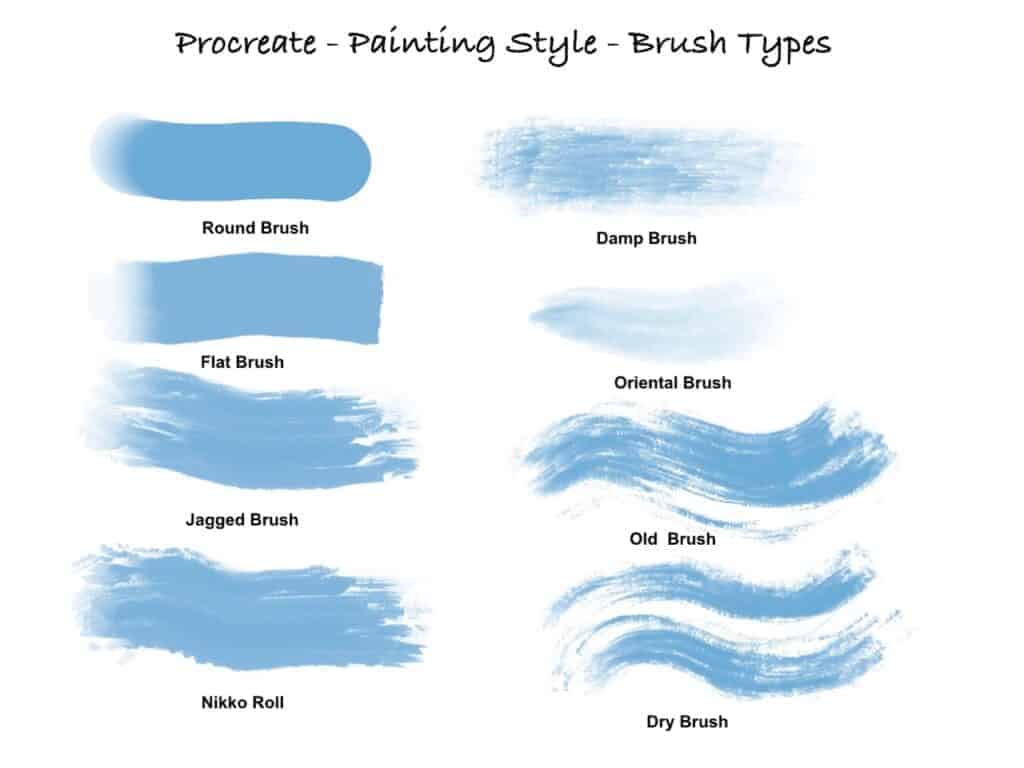
Procreate has many fun brush tools that you can check out and see how they will look. The tools include sketching, inking, calligraphy, painting, artistic, airbrushing, textures, abstract, charcoals, elements, spraypaints, touchups, retro, luminance, industrial, organic, and water.
Each one of these brush tools will also have about eight different ways it can be used, and you can also adjust the size of the brush.
One of the more common ones that most oil painters would use is the Painting brushes or Artistic Brush tools. Below, I am showing you some ideas of how one color looks when used with different brush tools. This was all done using the Apple iPad pencil.
Layout Your Paintings Before You Paint
I lay out my paintings on the Procreate program. I like to paint animals, but I always want to humanize them when I paint them. So, I will usually put on some hats, glasses, or flowers for the animals I paint. Procreate makes it easy to be able to do this.
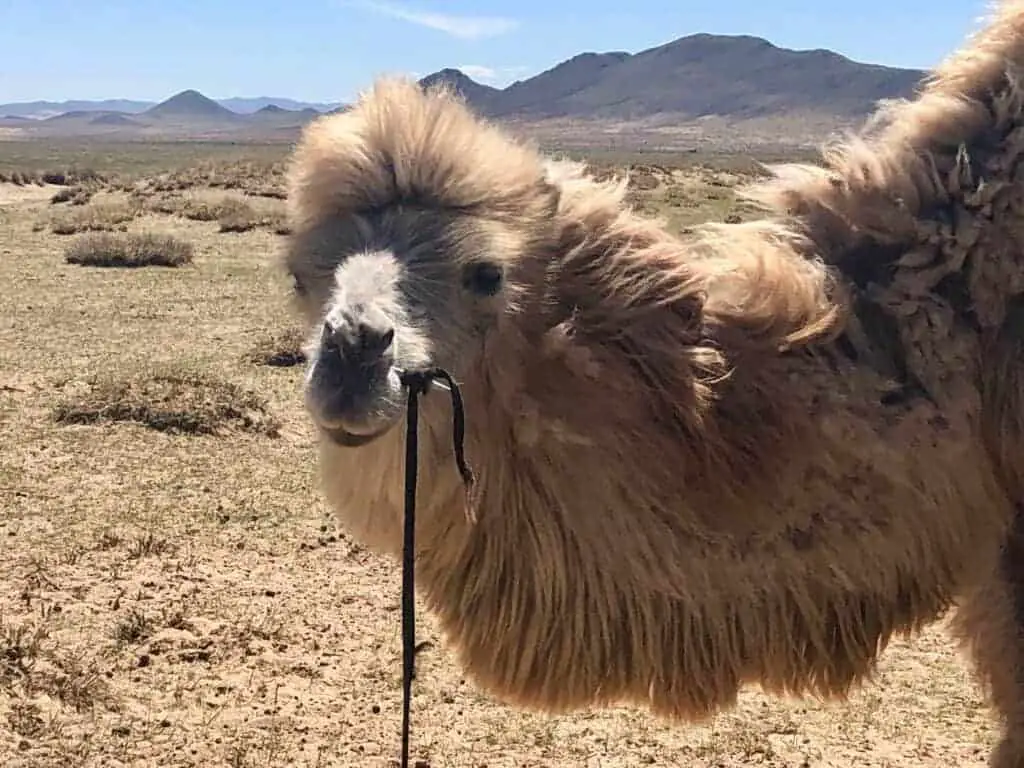
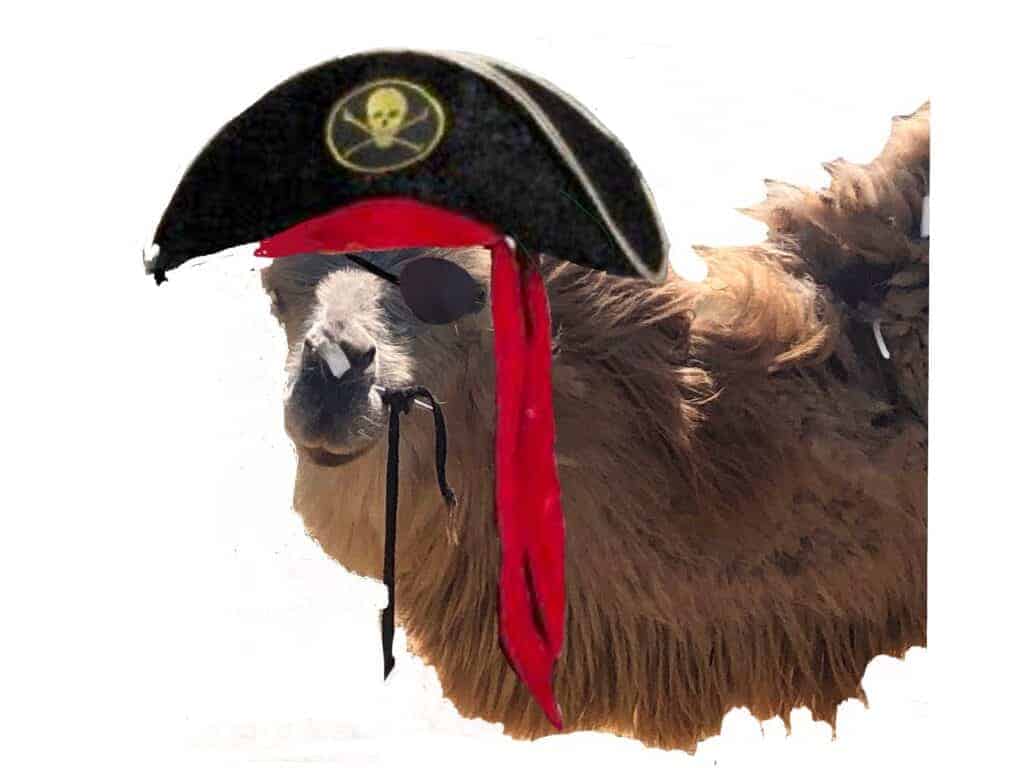
You can import photos as the photo I am showing below, a camel I rode this year in the Gobi Desert in Mongolia. The minute I rode him, I knew I wanted to find a way to paint him but to do it in a fun way.
I made him Joe Camel – The Pirate of the Gobi Desert. So I needed to find a pirate’s hat, patch, and a scarf to paint on him. As Procreate works in layers, similar to Photoshop, you can add layers on top of a photo to create the photo you need.
Steps To Layout A Photo to Paint Using Procreate
I use the Procreate app to help me lay out my paintings in Procreate. Here are the steps I took to lay out my photos in Procreate as a base for my painting.
- Import Photo as the First Layer – I imported the camel’s photos onto the first layer of Procreate. On the left-hand side of Procreate is a tool button (This is right next to the Gallery), and then look under Actions, Add, and then Add Photo. You can insert a file or take a photo and then insert it.
- Erase Background with Eraser Tool – I then took the erase tool at the top left-hand side of the screen and erased all the background. I did not need to do this step, but as I wanted to have a clean background to work from, I decided to do this step, so my background was white. I also wanted to see how the camel would look without a background as was in the original photo, and I wanted to see different back color combinations as it would be a painting. I also did not need it to be perfect, just enough to trace the photo onto my canvas.
- I found a hat and scarf and an eye patch for other layers – I went onto Google and found a hat and scarf I liked and the eye patch to have them ready to work with for the next few steps. I placed them in my photos so I could easily find them.
- Placement of Second Layer onto the First Layer – I then placed this second layer onto the camel’s first layer. The second layer was the hat and scarf I had found. I did this the same way as I added the first layer, adding a photo on the layer.
- Erased the second layer background – As I did on the first layer, I erased the second layer’s background, so I also had a clean background.
- Placed hat and scarf on the Camel – Once this is completed, I can place the hat and scarf on the first and camel layers. What is excellent about Procreate is that you can play around with the size using your two fingers or a pencil on the iPad. This allows me to decide how large or small I want the hat and scarf to look on the camel. If needed, I can also quickly flip it using the flip tool at the bottom of the screen. All these steps help give me some perspective on what I want and how it will look before I actually paint it.
- Add the Eye Patch – Like the first and second layers, I will add the third layer, the eye patch.
- Erase Background of the Third Layer – I will also erase all the background of the third layer or the eye patch, so there is no background.
- Placement of the Third Layer to the First Two Layers. – Then, I will adjust the third layer or the eye patch and place it where I want to on the camel.
- Export to Your Photos – Once completed, you can return to the Tools, Actions, and the Share Button. I usually share the image as a JPEG and then export it to save the image in my photos. Procreate gives you several ways to share the image, such as a Procreate image, PSD, PDF, Jpeg, PNG, and TIFF. You can choose the format by which type of image is better for you to use.
Now that my photograph is complete, I can use this as I would any other photo on my iPad. ] I will usually take this photo and print it out to trace some of the proportions onto my canvas.
One of the things I love about this method is that before I have even painted anything on the canvas, I already have an idea of what I will paint and how I will paint it. If I want to, I also adjust any colors on Procreate. The scarf was red, and I liked the red color, but if I wanted to change the color or adjust the red color, I could have also changed the color by using Procreate.
I love Procreate because this entire process, once you master it, is straightforward. And I find it saves me time with my painting as I am not painting over mistakes as much as I used to. It also helps me think and plan what I will put on a canvas before painting. But like most artists, I am a visual person, so I love being able to see it all visually first.
Check Out Your Color Combinations
With the Procreate app, you can check out how colors will look on a painting before painting them on the canvas. Here is an example of my Camel Joe, Pirate of the Gobi Desert painting. I checked out several background color combinations before I decided on the yellow color for the background.
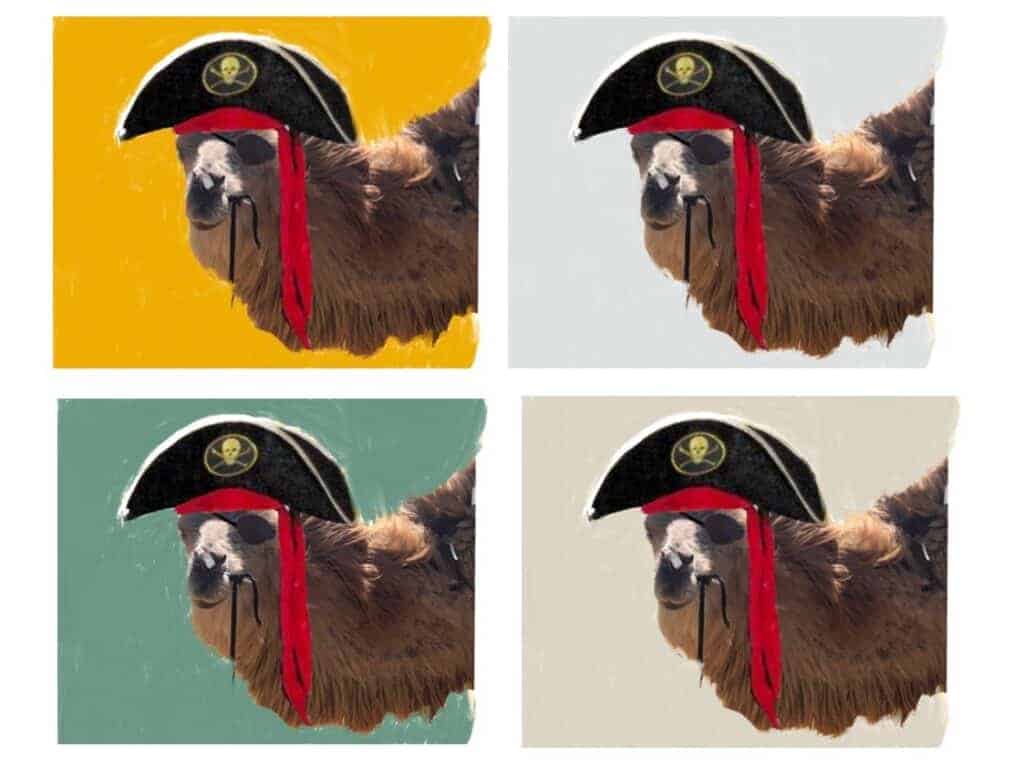
I mainly used the old brush on the Procreate brushes (you can see an example of these brushstrokes above in my chart). I wanted the background to be one solid color as I tend I have a background that may have several color tones to it.
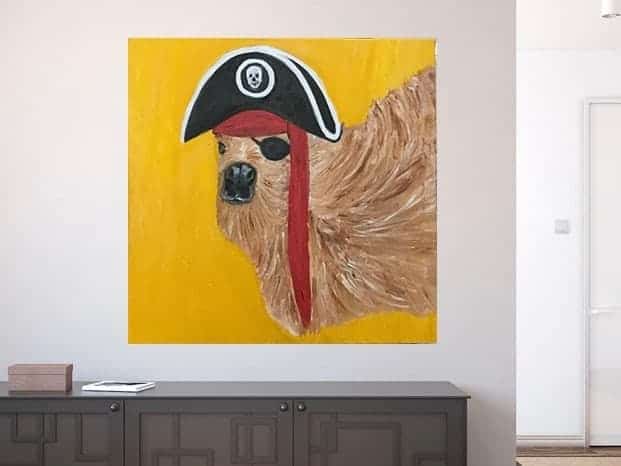
This is my final Camel project that I painted using Procreate. You can see the yellow background, hat, scarf, and eye patch on the camel.
Procreate is a great tool to help you with your oil painting. It can help you to save time by not making mistakes with colors or other things. You can decide on a palette of colors with their palette features, and you can lay out how the canvas will look before you actually paint on the canvas.
One of the best things about all this is that Procreate is easy to learn. You need to master a few basic steps, experiment, let your creative imagination run wild on the IPad first, and then paint it all down on your canvas.
Frequently Asked Questions
What iPad do I need to buy to use for Procreate?
You need an Apple iPad Pro, Apple Air, or Apple iPad to use Procreate. All the new models of the iPad should work just fine and should work with the Procreate App.
Do I need an Apple pencil to use Procreate?
To fully utilize Procreate, an Apple Pencil is essential. Investing in a high-quality Apple Pencil is advisable rather than opting for less expensive alternatives designed for iPad compatibility. Procreate is optimized to perform at its best with the Apple Pencil, ensuring a seamless and efficient creative experience.
How do I purchase Procreate?
You can download Procreate directly from the App Store. The cost is about USD 9.99. It is an absolute bargain as you do not need additional subscriptions or other charges.
What devices are compatible with Procreate?
Procreate is specifically designed for the Apple iPad. It works best with models that support Apple Pencil for the fullest experience. It’s not available for Android devices or other tablet brands.
Can Procreate files be exported to other software?
Yes, Procreate supports various file formats for export, including PSD, PNG, TIFF, and JPEG. This makes it easy to transfer your work to other software like Adobe Photoshop for further editing.
Is Procreate suitable for beginners?
Absolutely! Procreate is user-friendly and suitable for artists at all levels, from beginners to professionals. It offers a range of customizable brushes and tools that cater to different skill levels and artistic styles.
Does Procreate offer any tutorials for new users?
Yes, Procreate provides various resources for new users, including a comprehensive handbook, online tutorials, and a supportive community forum. These resources are great for learning the basics and advanced features of the app.
Anita Louise Art is dedicated to art education, great artists, and inspiring others to find and create their art. We love art that uplifts and inspires. #ArtToMakeYouSmile! #ArtToMakeYouHappy!
If you want to see any of my art, you can find out more by clicking here. If you are interested in what inspires me and my paintings, you can discover more by clicking here.
We have a free newsletter and would love you to be part of our community; you can subscribe to the newsletter by clicking here. I would be happy to talk to you if you have any questions. You can reach me, Anita, by clicking here.
Subscribe to our Anita Louise Art YouTube Channel filled with great videos and information, by clicking here.
Join us for our podcast “5 Minutes With Art.” Spend 5 minutes a week with us to discover and learn about great art and artists. You can find out more about our podcast by clicking here.
Related Questions
Artist Tips – Procreate App Ideas
Procreate is a digital app that you can use to produce digital art. You can also use it to layout your artwork or help you make decisions while painting a piece of artwork. Many artists use it as a digital art journal; when they see something that inspires, they can take a photo and draw it right on the iPad using the Procreate app.
By clicking here, you can discover more by reading Artist Tips – Procreate App Ideas.
Is Procreate Worth It? 11 Reasons Why Artists Should Use Procreate
An art museum will help to collect and preserve works of art. They also interpret the art and help to educate us all about art. Many art museums will have programs that will allow you to even experiment with different types of art. The core role of an art museum is to inspire us about art.
You can discover more by reading Is Procreate Worth It? 11 Reasons Why Artists Should Use Procreate by clicking here
Is Procreate Easier Than Photoshop? What One Should An Artist Learn?
Procreate is a much easier computer program to learn than Photoshop, especially if you are new to the Adobe program. The Procreate program is a fabulous computer program to lay out your artwork before painting on the canvas. Photoshop can also design your artwork, but as it is a more robust program than Procreate, it will take much longer to master.
You can discover more by reading Is Procreate Easier Than Photoshop? What One Should An Artist Learn? by clicking here.