At one time or another, most artists will need to learn how to stretch their own canvas. I know it can seem to be very daunting to have to do this when you are first starting out, but it is not as difficult as it may seem.
To stretch your own art canvas you will first need to have all the correct supplies and tools. Then you will need to assemble the stretcher bars onto a frame and put the canvas on the frame with a staple gun. The canvas should be taut and tight like a drum. Once you are sure the canvas fabric is taut or tight as a drum, you can then put the gesso on to the canvas to prepare the art canvas for painting.
Table of Contents
- All About the Canvas
- Tools to Stretch Your Canvas
- Steps to Stretch the Canvas Correctly
- Recommended Canvas Stretching Supplies
- Frequently Asked Questions
- Related Questions
All About the Canvas
The first thing for any artist to understand is what exactly is the canvas fabric that they are painting on.
Canvas Fabric
The canvas fabric that most painters use today is called cotton duck fabric. One reason the cotton duck fabric is used is that it is durable and is smooth with an even weave. This kind of fabric also stretches well and so this is the fabric that most painters use.
We recommend that you consider buying a medium-weight canvas fabric. The medium weight will not show the bars as much as a lightweight fabric will. You can get the medium-weight fabric primed or unprimed.
We recommend for beginners to first get it primed and then once you are used to stretching the canvas, you can consider getting it unprimed. you can find out more about our recommended medium weight cotton canvas fabric by click here.
Some professional oil painters will use linen. The reason is that linen is especially good for oil paints. The old masters also used a sturdy brownish or hemp kind of fabric. So, in reality, there are many kinds of fabrics and surfaces that can be used for painting.
If you are interested in getting some linen fabric, we recommend the Belgium linen fabric that is unprimed. You can find out more about the unprimed Belgian linen canvas fabric by clicking here.
One of the great things about art and being an artist is that you can experiment with other materials. For example, If you want a weave to show through some of your work you can try to get a fabric that is not as smooth and see how that works out.
Sometimes we have also stretched the backside of the cotton duck canvas and painted on that as we wanted more of the fabric weave to show through.
We recommend that you find the fabric that works best for you and the art you are doing. To see the complete selection of all the canvas and types of fabrics available you can click here,
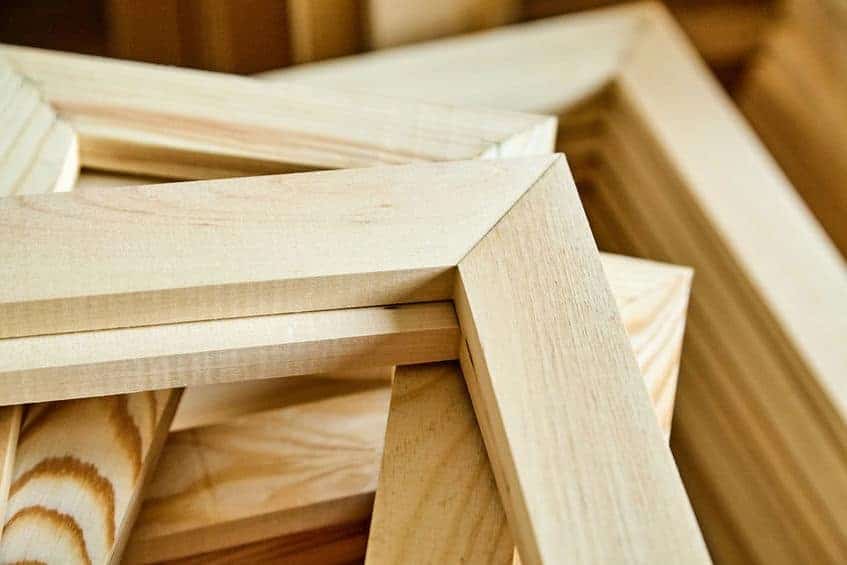
Wood stretchers bars
The quality of your wood stretchers is very important. Good quality wood stretcher bars can help make it easier for you to stretch your fabric onto the wood.
Here are a few things you need to be aware of if you are going to purchase wood stretcher bars to make your frame:
- Squared corners – The corners need to be perfectly squared or the canvas will not stretch tightly over the frame. Many of the good frames will have additional staples or nails in the corner to make sure the corner is secure and perfectly framed. This staple or nail can add stability to the frame. But today with many of the manufacturing techniques the glue and nail cannot always be seen from the outside of a pre-made frame you may purchase.
- Wood Moisture– Wood is a natural material so if you do not buy wood that is properly kiln-dried it can and will crack especially when the climate changes. The moisture level of wood should be between 6 to 8% for most types of wood. One reason you need to be sure the wood is of the quality you need is that if the wood cracks it can affect the tightness and stretch of the canvas itself.
- Wood Quality – The wood used for the stretcher needs to be strong enough to hold the frame and yet soft enough so you can staple it into the frame to stretch the fabric over the frame.
If this is sounding a bit complicated the good news is that most frames you purchase today will have the correct wood and will be strong enough and perfectly squared. I have taken many pre-stretched canvases and then taken the canvas off and stretched a new canvas on it.
If you want to make the stretchers yourself, then we recommend, the medium-duty stretcher bars as they are made out of knot-free kiln-dried pinewood Though pinewood is a softwood, it would be strong enough for the frame while allowing you to also easily staple the canvas to the frame.
You can find out more about the medium bar stretchers by clicking here. If you want to have a more heavy-duty or a lighter-weight stretcher you can see the complete list of available bar stretchers by clicking here.
Tools to Stretch Your Canvas
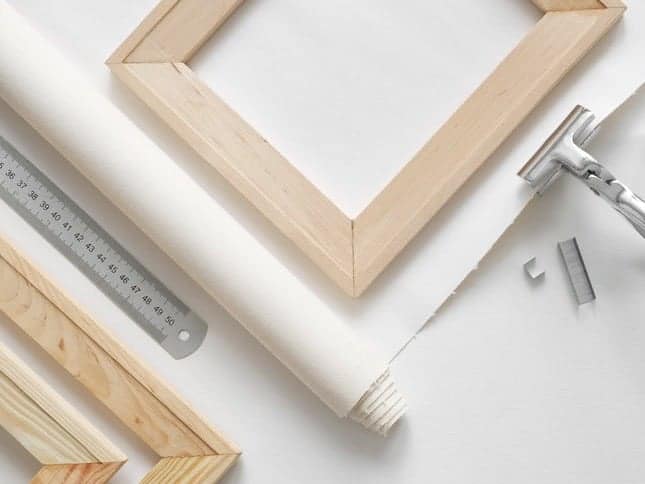
To properly stretch your canvas there are some simple tools that you will need to have.
Tools that you will need to stretch your canvas:
- Spray bottle – You should have a spray bottle filled with water. It is common to dampen the back of the unprimed stretched canvas when you are stretching the canvas. This is because when the fabric starts to dry it will shrink and tighten the canvas.
- Sponge – Like the spray bottle once the unprimed canvas is stretched on the frame it is good if you can take a sponge with hot water and go over the stretched canvas. The hot water will help to shrink the cotton fabric and give it a very tight drum-like kind of stretch.
- Canvas Pliers – You can find canvas pliers at most art stores or from online suppliers. We love these canvas pliers as they have a nice rubber handle which makes them easy to use. You can find out more about these premium canvas pliers by clicking here.
- Rulers – You will need a large metal ruler so that you can measure the edge of the canvas that you are stretching. The measurement does not need to be perfectly straight but to have a large ruler helps you to get it closer than it would be without one. We recommend you get a longer ruler like one that is 24″ or longer You can view our recommended stainless steel rulers by clicking here.
- Staple Gun – You will need to have a basic staple gun with some staples. We love the Stanley heavy-duty staple gun. We love how it is heavy-duty but easy to use. You can find out more about Stanley’s heavy-duty staple gun by clicking here.
- Scissors – You will want to have a good pair of scissors for cutting the canvas. We prefer to use a heavy-duty kind of scissor as it makes cutting the fabric easier. We love these Fiskar scissors as they can cut through some heavy fabric. You can find out more about the Fiskars Premier Scissors by clicking here.
- Small Hammer – A small hammer or mallet will help you to secure the staples. We love this small PVC Hammer as it will not damage the wood. You can find out more about the Hawk Hammer and Mallet by clicking here.
The above are the basics that you will want to have to stretch your canvas. Here are a few extras that you could also consider to make the stretching of the canvas a bit easier.
- Professional Tailors Chalk – We like to use a professional tailor’s chalk. The reason is that we will use it to measure and mark on the canvas where to cut the canvas. A tailor’s chalk will come off of the fabric easily and not damage the fabric. You can find the professional tailor’s chalk by clicking here.
- Measuring Tape – We always like to have a measuring tape to help us with the measurements. You can see more of the type of measuring tape we recommend to use by clicking here.
Steps to Stretch the Canvas Correctly
Now that you have an idea of what supplies you will need. Here are the steps you will need to take to stretch your canvas.
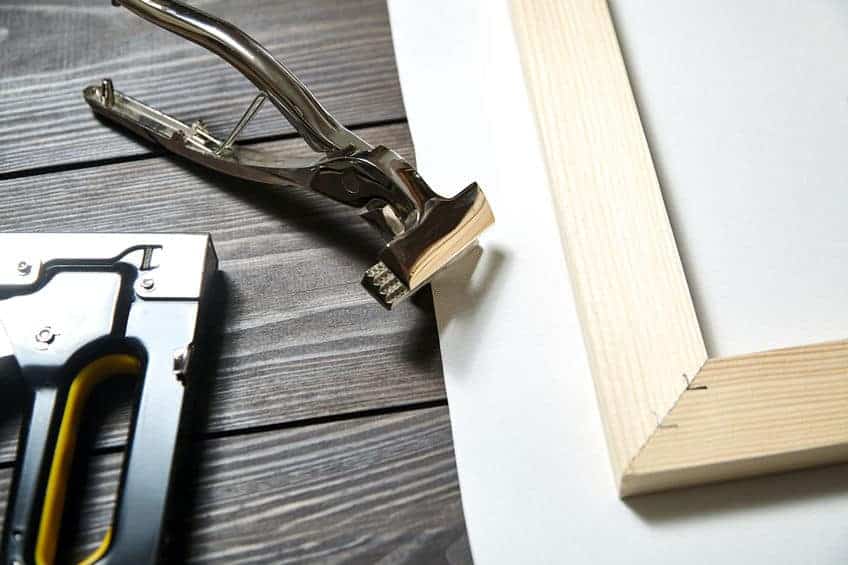
Step One – Make the Frame
The first thing you will need is to make the frame and assemble the bar stretchers if you do not already have a frame you will be using.
Things to remember when making the frame out of the stretcher bars:
- Must be square – ‘the frame must be square. When assembling the frame try to use a carpenter square or a T-square so you can be sure that it is perfectly square.
- Make sure it is snug and tight – Make sure where the frame is joined that it is snug and tight. If it is too tight you can try to sand it slightly.
- Assembly with the lip in the correct position – A proper stretcher bar should have a lip to it. Some bars will have lips on the front and backside and others just on one side. Be sure to have the lip on the correct side and with the lip facing in the right direction. The lip will help to keep the stretched canvas away from the wood.
If you do not feel comfortable assembling the stretcher bars, that is OK. I have taken many canvases off an old frame and then re-stretch the canvas onto that same frame. You can also do the same or buy the frame already stretched and ready to go.
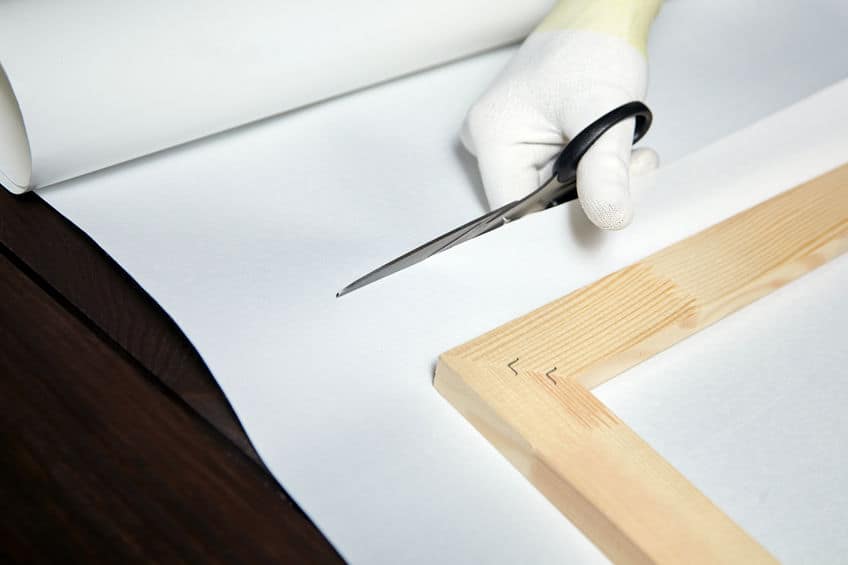
Step Two – Cut the Canvas
The next step is that you need to cut the canvas. There are several ways you can do this, but one of the easier ways is as follows:
- Spray water on the area of the canvas you will stretch – Use your spray bottle and spray a bit of water on the area of the canvas you will stretch. This will help to give it a tighter stretch. Use water especially if the canvas is unprimed
- Place your canvas on a flat surface. – Place your canvas with the back face up on a flat surface. Be sure to work on a flat surface like a table as this will be much easier.
- Place the frame on top of the canvas – Then place your frame on top of the canvas leaving about 1 or 2 ” on each side. How much you will need for this will depend on the width of the frame.
- Cut around the fabric – Then measure and mark around the canvas. As we mentioned we like to use tailor’s chalk to draw a line so we know where to cut the fabric. Then cut around the fabric being sure to have enough fabric so that you can plug and staple it on the backside of the frame.
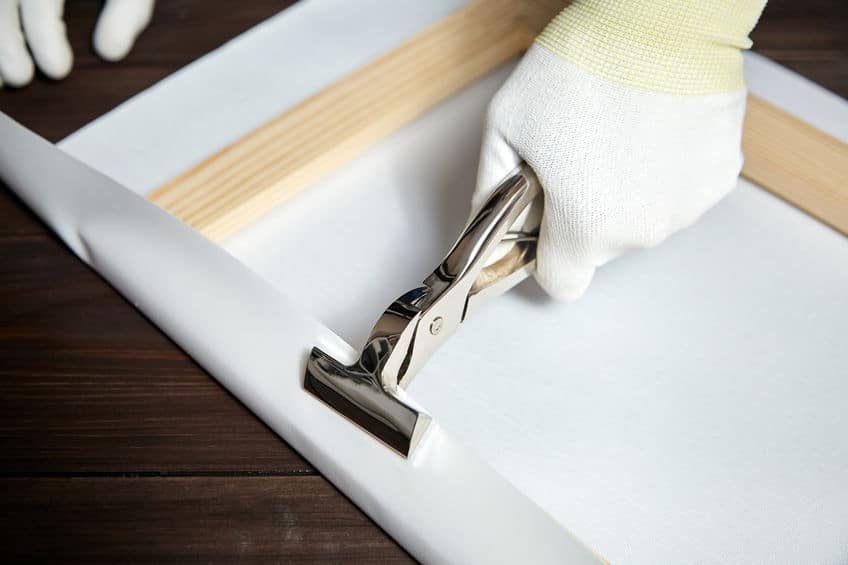
Step Three – Stretch the longest side
Now the canvas is cut you are ready to staple the canvas fabric to the frame. Check again that the fame is on the right side with the lip towards the canvas and not on the backside. For this step, you will fold and staple the fabric to the frame.
Some pointers to stretching the canvas:
- Stretch the longest side of the canvas first – Always start with the longest side of the canvas and stretch that first. If you have a completely square-shaped frame, then just choose one side to start stapling.
- Always secure the canvas from the middle to the corners – When you work with the canvas always work from the middle to the corners. Never start at the corners and go in.
- Pull one side of the fabric – Pull one side of the fabric and staple it right in the middle of the frame.
- Pull on the other side of the fabric – then pull on the opposite side of the fabric. Make sure it is tight like a drum. Once the fabric is pulled and if the tension is equal then all the wrinkles on the fabric should disappear.
- Staple slightly at an angle – It is best if you can staple slightly at an angle to the weave of the canvas. This will help to make sure that the staple will not tear through the weave of the fabric.
- Rotate the canvas or move around the table – Depending on what kind of table you are using, either simply rotate the canvas or move around the table to staple the canvas. This will help you to more easily staple the canvas at the angle you are to staple it.
- Staple and pull all, except the corners – you can staple and pull all except do not staple or fold the corners yet.
Step Four – Staple the smaller sides
Once you have stapled on the longest sides of the canvas and stretched it properly then you want to continue to staple the shorter sides.
Some pointers to staple the canvas onto the frame:
- Stretch the shorter side of the canvas – Now start to stretch and staple the shorter side of the canvas.
- Always secure the canvas from the middle to the corners – Like with the longer side of the canvas always work from the middle to the corners. Never start at the corners and go in.
- Pull one side of the fabric – Pull one side of the fabric and staple it right in the middle of the frame.
- Pull on the other side of the fabric – then pull on the opposite side of the fabric. Make sure it is tight like a drum. Once the fabric is pulled and if the tension is equal then all the wrinkles on the fabric should disappear.
- Staple slightly at an angle – It is best if you can staple slightly at an angle to the weave of the canvas. This will help to make sure that the staple will not tear through the weave of the fabric.
- Rotate the canvas or move around the table – Depending on what kind of table you are using, either simply rotate the canvas or move around the table to staple the canvas. This will help you to more easily staple the canvas at the angle you are to staple it.
- Staple and pull all, except the corners – you can staple and pull all except do not staple or fold the corners yet.
Step Five – Staple and Fold the Corners of the Canvas
Now that you have staples on all the sides you are now ready to finish the canvas and to staple and fold the corners of the canvas.
Some pointers to stapling and folding the corners of the art canvas:
- Pull and Tuck – You can tuck one side of the corner under and then fold it neatly. Keep a straight edge.
- Final tightening – This is the final tightening of the canvas so it must be firm and equal. This is a very important step and may take some practice to get right.
- Can make a slit on the canvas – Some people like to make a small diagonal slit in the canvas to help to stretch and fold it neater.
- Make the corners look as neat as possible – This is an important step as you want the corners to look as neat and clean as possible.
Step Six – Finishing the Canvas
Now that you are finished, you can check the tightness of the canvas. It should be tight like a drum.
Some pointers to checking your canvas stretching:
- Test the tightness – You can test the tightness of the canvas by tapping it with your finger. It should sound like a drum and feel taut. If you can see creasing or some strange pulling you may need to take out some staples and re-pull and stretch the canvas. It is very important the canvas is taut and tight as it will sag when painted so you must start with a canvas that is taut and firm.
- Hammer the staples – Once you are sure that your canvas is very tight then you can finish by slightly hammering in the staples. Many times when you staple the staples may not be all the way in so we like to go around the backside of the canvas, with a small hammer to make sure the staples are completely secure.
- Shims or Wood Wedges – Some frames and canvases will come with some small shim that can be inserted at the corners to help to further stretch the canvas. This is not always necessary but if you want to be sure you can place them on the backside of the canvas in the corners.
- Sponge hot water – Some artists like to sponge a bit of hot water on an unprimed canvas to help it be very tight and firm. Do not overwet the canvas but give it enough hot water to try to smooth it out and tighten it.
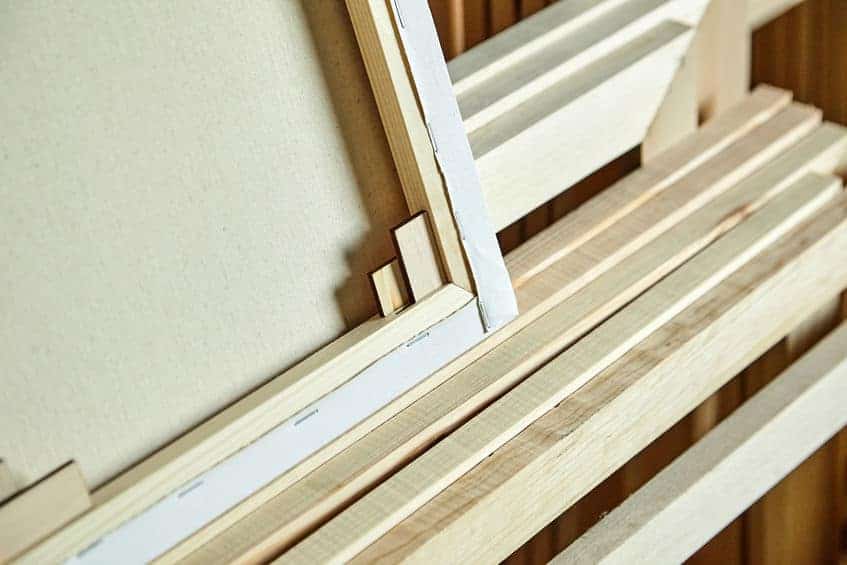
Step Seven – Let the Canvas Rest
Once you have stretched the canvas it is best if you can let it rest for a few days. This will help to ensure the canvas is really tight and firm.
Some pointers to let your canvas continue to firm up:
- Rest the canvas for two days – it is best if the canvas can rest and set for about 2 days before you start to gesso or paint on it. This will allow it to continue to tighten up on the frame.
- Keep in a dry place – Try to keep it in a dry place at room temperature free of excessive moisture or humidity. Do not put it outside.
Step Eight – Prime the Canvas
After you have stretched your canvas and it has sat for a while to properly set, you are ready to prime your canvas.
Pointers to priming your canvas for painting:
- Apply one coat of gesso – First, apply one thin coat of gesso then allow it to dry to the touch.
- Apply a second coat of gesso – Now apply a second coat of gesso over the first coat and allow it to completely dry. Read the instructions on the gesso to see how long the drying time will be.
- Sand the gesso – Use extra-fine sandpaper to lightly sand the gesso off. Especially look to sand off any unwanted bumps or marks.
- Apply a third coat of gesso – Now you can apply your third and final coat of gesso.
- Sand the gesso. – slightly sand the gesso again. Be sure to sand off any bumps or texture so the surface is very smooth.
- Paint the gesso in the same direction – when you are painting on your gesso, try to paint your gesso primer in the same direction. By painting it this way it should give you a fairly clean finish. Also sanding the gesso will help get rid of any bumps and will help the primed canvas to be very smooth.
For the gesso, we recommend the studio acrylic gesso as it can be used for most kinds of painting. You can find out more about the studio acrylic gesso by clicking here.
And for the sandpaper, we recommend that you consider getting this package of fine sandpaper. You can find out more by about the sandpaper by clicking here.
Recommended Canvas Stretching Supplies
Throughout this article, we have recommended quite a few different art canvases stretching supplies and tools. You can find the full list of our recommended canvas stretching supplies and tools by clicking on our page Canvas Supplies or by clicking here.
As a full disclaimer, Anita Louise Art can earn an affiliate income if you purchase through our website.
This does not cost you any more than if you purchased the supplies directly from the supplier. By helping to purchase through our site, you are helping to support this blog and website.
We truly do appreciate your continued support.
If you have the correct tools and supplies then stretching an art canvas onto the frame is easier than what it may at first seem. You just need to follow these simple steps and remember that the most important thing is to be sure that the art canvas you are stretching is as firm and taut as a drum so that it will not sag over time.
Anita Louise Art is dedicated to art education, great artists, and inspiring others to find and create their art. We love art that uplifts and inspires. #ArtToMakeYouSmile! #ArtToMakeYouHappy!
If you want to see any of my art, you can find out more by clicking here. If you are interested in what inspires me and my paintings, you can discover more by clicking here.
We have a free newsletter and would love you to be part of our community; you can subscribe to the newsletter by clicking here. If you have any questions, I would be happy to talk to you anytime. You can reach me, Anita, by clicking here.
Subscribe to our Anita Louise Art YouTube Channel with great videos and information by clicking here.
Join us for our podcast “5 Minutes With Art.” Spend just 5 minutes a week with us to discover and learn about great art and artists. You can find out more about our podcast by clicking here.
Frequently Asked Questions
How Much Does it Cost to Stretch an Art Canvas?
Stretching your own art canvas is usually cheaper than if you purchase the stretched canvas, but the cost can depend on a lot of things from the fabric you are using to the size of the frame. For a basic fabric and frame, the cost is usually between 7 or 8 USD to 20 or 25 USD or more depending on the fabric and size of the frame. If you are planning to do a lot of painting, learning to stretch your own canvas is an essential skill.
What is a Stretched vs Unstretched Canvas?
Sometimes when you purchase oil paintings they may sell them to you stretched or unstretched. Here is the difference:
Stretched Canvas – A stretched canvas is a painting that is on the frame already. So there will be no need for you to re-frame the canvas before you frame and hang it.
Unstretched Canvas – An unstretched canvas is a canvas that was previously stretched but was taken off the stretcher bars so that it can be rolled up. Unstretched canvases will then be re-stretched and framed to be hung up.
What is canvas stretching?
Canvas stretching is the process of pulling a canvas fabric over a wooden frame (called a stretcher bar) and securing it in place. This creates a taut, smooth surface suitable for painting or displaying artwork.
Why is it necessary to stretch a canvas?
Stretching a canvas ensures that the painting surface is tight and even, preventing sagging or warping. It also allows the artist to control the tension of the canvas, which can affect the texture and appearance of the final artwork.
Can I stretch a canvas myself, or should I get it done professionally?
While you can stretch a canvas yourself with the right tools and knowledge, professional stretching is recommended for larger or more delicate canvases to ensure quality and longevity.
What materials do I need to stretch a canvas?
You’ll need a pre-primed canvas, stretcher bars, a staple gun, staples, and possibly canvas pliers for a tighter stretch. A hammer and scissors might also be useful.
How do I choose the right size stretcher bars?
The size of the stretcher bars should match the dimensions of your canvas, allowing for some excess canvas to wrap around the edges. Ensure the bars are straight and without warps.
Is it better to paint before or after stretching the canvas?
Most artists prefer to stretch the canvas before painting. This provides a stable and consistent surface to work on. However, some may paint on un-stretched canvas for specific techniques or effects.
How do I care for a stretched canvas painting?
: Keep it away from extreme temperatures and humidity. Avoid touching the surface and clean it gently with a soft, dry cloth. If the canvas becomes loose over time, it can be re-tensioned or re-stretched.
Related Questions
Why Do People Say, ”Life Is Like Drawing Without An Eraser?
Often, artists, myself included, will use an eraser to remove any marks or measurements we may have made on a paper to measure out and organize their drawings or artwork on their canvas or paper. For most artists, having a good eraser is essential.
By clicking here, you can learn more by reading Why Do People Say, ”Life Is Like Drawing Without An Eraser?.
Is Communism Good For The Arts?
Communism is not suitable for art, and for many artists under Communism art should have a purpose and way to help further the communist ideals and ideology. In a Communist society, many artists are labeled as dissidents; others are forced to use their talents to create propaganda art.
By clicking here, you can learn more by reading Is Communism Good For The Arts?.
12 Years Leonardo Painted Mona Lisa’s Lips, Facts Or Fiction?
There is no evidence to show that Leonardo da Vinci spent 12 years painting the Mona Lisa smile. Most scholars believe that he painted the painting in 4 years but then had the painting much longer in his possession. He could have worked on it a bit or adjusted it when he had it in his possession, but there is no evidence to show that.
By clicking here, you can learn more by reading 12 Years Leonardo Painted Mona Lisa’s Lips, Facts Or Fiction?.